Microsoft Word 365 Accessibility
Microsoft Word includes options for adding accessibility information to documents to support access by individuals with disabilities. This information also ensures that Microsoft Word documents converted into other formats (e.g., tagged PDF, ePub, DAISY, etc.) maintain this level of accessibility.
The best practices for Microsoft Word accessibility include attention to:
- Heading styles are nested in a logical and sequential order. Content is organized into meaningful sections using headings.
- List Styles are formatted using the embedded list tool.
- Images have appropriate alternate text; images unrelated to page content are designated as decorative.
- Link text is meaningful, descriptive, and in context.
- Tables are for data with identifiable headers and header rows identified.
- Color and contrast are sufficient. Color is not used alone to convey meaning.
- All pages are reviewed with an accessibility checker.
When you are finished creating an accessible Microsoft Word document, you may want to learn how to export to other formats such as a PDF.
Headings can provide an organizational and navigational framework for a document's content, communicating both the informational hierarchy and relationship between different sections. Headings also provide a simple mechanism for an individual using assistive technologies to "jump" from one heading to the next when navigating the document.
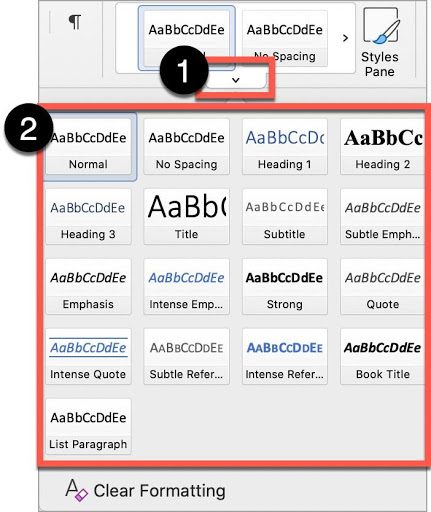
- From the Home tab, choose the Styles Pane. This will open the list of heading and other styles for use in the document.
- Place focus on the appropriate content and choose the relevant heading style.
- Headings can be marked with the following
- Mac keyboard shortcuts:
 + Option+1 applies the Heading 1 style
- + Option+2 applies the Heading 2 style
- + Option+3 applies the Heading 3 style
- Windows keyboard shortcuts:
- CTRL + ALT + 1 applies the Heading 1 style
- CTRL + ALT + 2 applies the Heading 2 style
- CTRL + ALT + 3 applies the Heading 3 style
- Mac keyboard shortcuts:
important Considerations
Technical Guidelines:
- Headings should follow a logical structure that identifies content based on the organizational content and hierarchy of information in the document.
- Avoid skipping heading levels - modify the style of the heading if you prefer a specific font or appearance.
Formatting Guidelines:
For additional guidance on formatting, please review the information on Structure.
- Headings should be short and succinct
- To change the appearance of a heading, read Modify a Style for more information or follow the directions below:
- Highlight the heading.
- Use the font and formatting tools to change the appearance.
- Right-click the heading style.
- Select Update Heading to Match Selection. This option will automatically update all of the heading styles in the document to the desired format.

- The default Heading 1 and Heading 3 styles lack sufficient color contrast.
- Select a darker font color for these heading styles such as black or dark blue. You may also wish to review the Identity Guide’s Typography section for additional guidance.

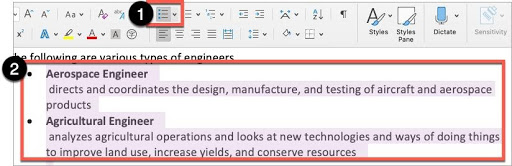
Lists provide a structured order to a group of connected or sequential content. A numbered or bulleted list may present the same information more effectively than simple data tables with fewer steps.
Lists in Microsoft Word
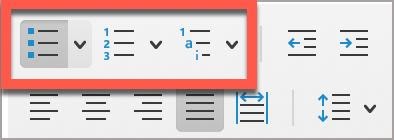
- Highlight the grouped list of items.
- In the Home tab, select the appropriate list style (i.e, numbered list or bulleted list).
important considerations
For additional guidance on formatting lists, please review the information on Structure.
List Guidelines:
- Remove any lists manually created, such as those using dashes or asterisk characters. Manual lists are not "true" lists.
- Avoid using indentation to provide a visual list in lieu of the list style button.
- Ordered or numbered lists are used to present a group of items (words, phrases, sentences) that follow a sequence.
- Unordered or bulleted lists are used for a group of items without a sequence.
- Lists should contain at least two or more list items, unless being used to create an outline.
- Nested lists are acceptable, such as a numbered list that contains a nested bulleted list.
Images that support the content require a text description (also called "alt text") that communicates the purpose and/or content of the image. This information is presented to the individual using assistive technologies, allowing them to hear the description of the image. Image descriptions should be short and communicate the main purpose of the image. Images that are considered decorative can be marked as such and are ignored by assistive technologies.
If a longer description of the image is necessary to fully explain its content, consider inserting a more detailed description of the image within the document text that precedes and/or follows the image.
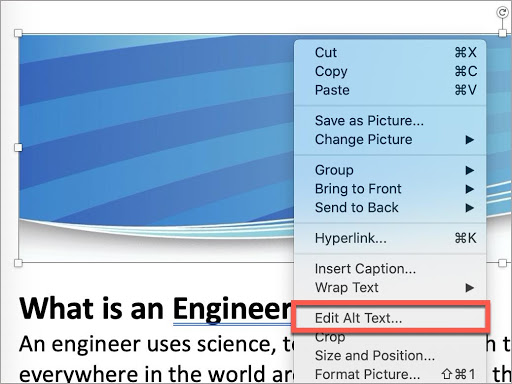
Adding Alt Text
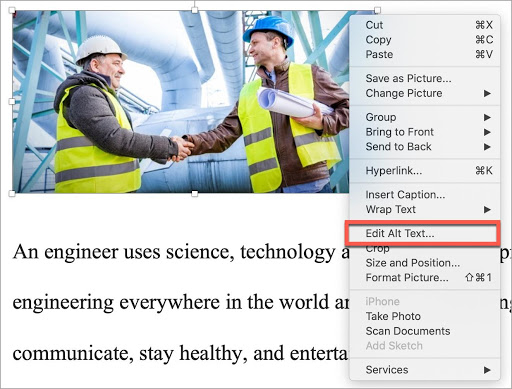
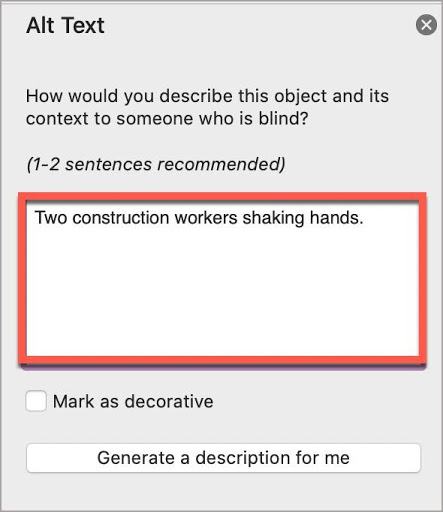
- Select and right-click the image.
- Select Edit Alt Text…
- Provide a brief and concise description and “X” or close the window.
Marking a decorative image
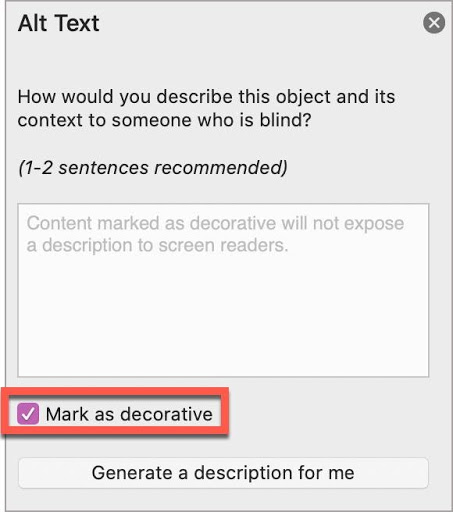
- Select the image. Right-click the image.
- Select Edit Alt Text…
- Select Mark as decorative and “X” or close the window.
Important Considerations
For additional guidance on writing effective text descriptions (i.e., alt text), please review the information on Images.
Technical Guidelines:
- "Behind Text" or "In Front of Text" is not recommended due to how this format setting can obscure text and make the content difficult or impossible to read.
- For older versions of Microsoft Word, leave the Title field bank, and only use the Description field for alt text.
Formatting Guidelines:
- A text description should convey the purpose or content of the image in approximately 120 characters or less. Avoid repeating the same information as contained in the surrounding text.
- If the image is complex, consider providing additional information in the surrounding text of the document while providing a shortened text description.
- Do not include the file format in the alt text (Example: .JPEG, .PNG)
- Do not include “picture of” or “image of” in the alt text.
- For older versions of Microsoft Word, leave the Title field bank, and only use the Description field for alt text.
Documents containing hyperlinks to websites or other online resources can be improved by including hyperlink text that is understood by the reader. Using the full URL as the hyperlink text may not make sense to the reader, particularly if it is long.
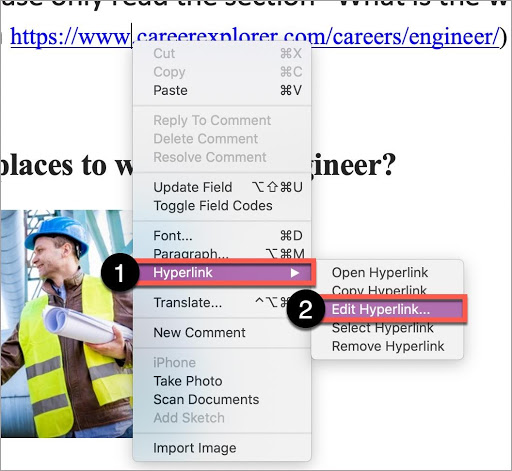
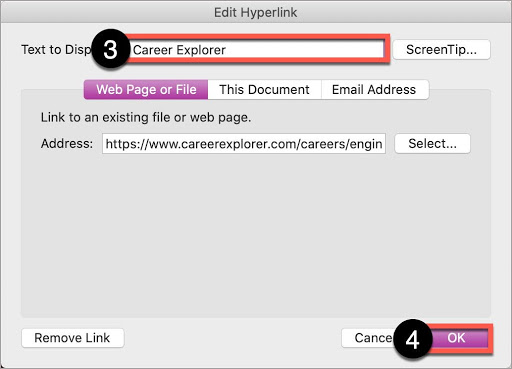
- Place the cursor anywhere on the desired hyperlink. Right-click the hyperlink.
- Select Hyperlink, then Edit Hyperlink.
- Under Text to Display, write the descriptive text for the hyperlink, keeping the text name short and descriptive.
- Select OK.
Important Considerations
Use link text that is descriptive and or informs the person as to the link’s destination. For additional guidance on formatting and why descriptive text is important for hyperlinks, please review the information on Links.
- At least one header (row and/or column).
- Alt Text description summarizing the table
Apply at least one header
To mark a header row for a data table:
- Select the table to reveal Table Design. (Note: this tab will only appear if the table is selected.)
- In the far left-hand section, determine the required header type:
- Header row: check the box Header Row.
- Column header: check the box First Column.

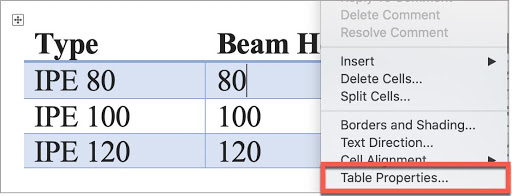
- Highlight the header row of your table. Right-click the table. Select Table Properties.
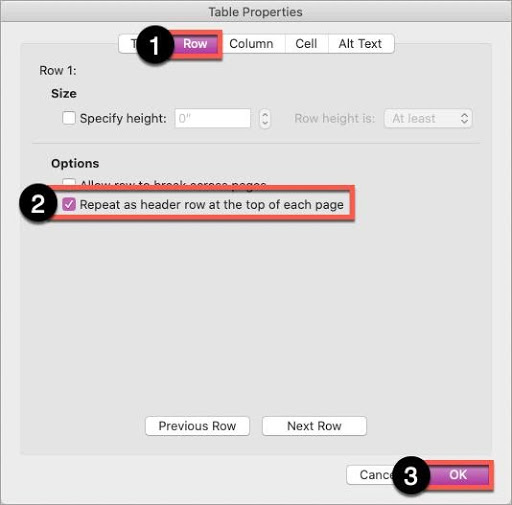
- In the Row tab, check the box Repeat as header row at the top of each page.
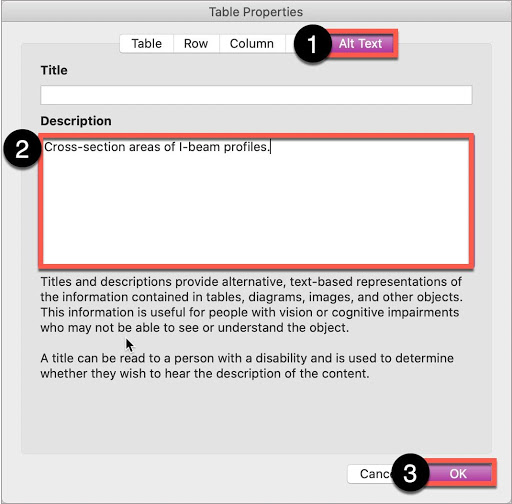
- In the Alt Text tab, write a short, one sentence description of what the table information presents.
- Select OK.
Alt Text descriptions summarizing the table

- Right-click the table. Select Table Properties.
- In the Row tab, check the box Repeat as header row at the top of each page.
- In the Alt Text tab, write a short, one sentence description of what the table information presents.
- Select OK.
Color can be an effective method to communicate ideas and draw attention to information. Ensuring there is sufficient contrast as well as using color in combination with other formatting can support a diverse campus community, including individuals with visual disabilities.
When choosing colors to present text information in documents, choose color options that provide a contrast ratio of:
- 4.5:1 for regular text
- 3:1 for 18 point font and larger, or 14 point font and bold
In general, pastel colors or the “light” version of a particular color do not provide sufficient contrast against a white background.
Contrast ratios may be evaluated using tools such as:
Color and formatting
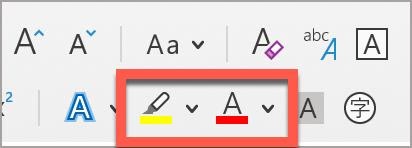
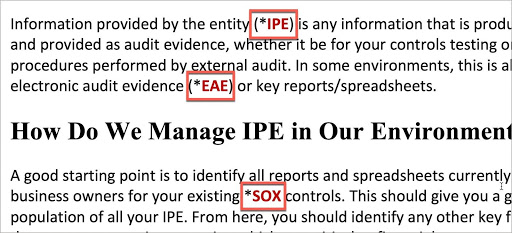
When using color to indicate a specific condition or state, include some formatting attribute to also provide a distinguishing characteristic. For example, if a list of vocabulary words were identified only in red text, this could present difficulties for an individual who had some type of color-blindness.
Options to support accessibility can include a combination of color AND formatting, such as:
- Red text with Bold formatting
- Using an asterisk, brackets, or other annotation symbols in addition to color
For more information on using color or these tools, please review the information on Color.
Microsoft Word features an accessibility checker that can assist in identifying accessibility issues.
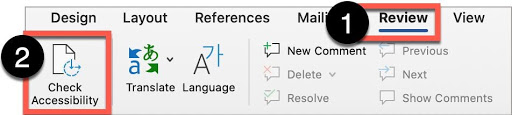
- On the ribbon, select Review.
- Select Check Accessibility.
- The Accessibility checker will appear on the right-hand side.
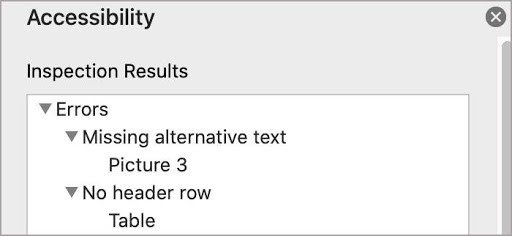
Errors, Warning, and Tips
The Accessibility Checker presents the results in a pane on the right-hand side of the interface. It organizes the results into three categories: Errors, Warnings and Tips.
- Errors- Must fix
Errors are issues which indicate content that contains an accessibility issue and is extremely challenging, if not impossible, to read or understand. - Warnings- Most likely will need to address
Warnings indicate that the content may be challenging for individuals with disabilities to read or understand. Resolving some Warnings may require the author to consider a different visual or organizational layout - Tips- Very helpful
Tips are pointers intended to help you improve the user experience of your audience by streamlining and organizing your content in certain ways. Tips provide additional guidance and will appear depending on the content.
The Accessibility Checker is a good starting point towards identifying potential accessibility issues in a document. Microsoft continually updates the Accessibility Checker rules and so newer versions of Microsoft products may result in a different list of accessibility results. Using the Accessibility Checker can help identify some of the more significant accessibility issues present in a document.
Exporting to other formats
Including accessible authoring practices into Microsoft Word documents allows for versions exported as other formats to retain most, if not all, accessibility features.
Important
Never choose a "Print" to PDF option in Office, or in any other program. A screen reader user may still be able to access the text of a PDF created in this way, but heading structure, alternative text, and any other tag structure will be lost.
Mac
For Mac users, read Microsoft Word’s Support for converting to PDF on your Mac for additional guidance.
- In File, select Save As…
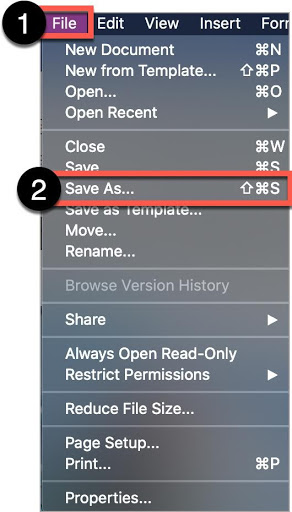
- Select PDF
- Select the radio button, Best for electronic distribution and accessibility (uses Microsoft online service).
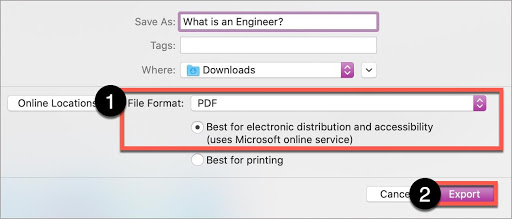
- Select Export.
It is easier to create an accessible MS Word document rather than trying to fix accessibility issues in a PDF document.
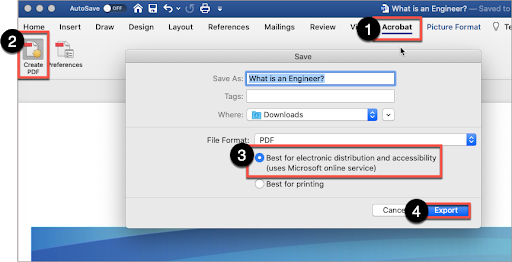
- Use the Acrobat plug-in in the ribbon. Select the Acrobat tab.
- Select Create PDF.
- If using a Mac with Acrobat Adobe installed, select Best for electronic distribution and accessibility (uses Microsoft online service).
- Select Export.