Canvas Studio
Introduction to Canvas Studio
Canvas Studio provides an integrated video sharing platform for SDCCD instructor and students to upload and record videos seamlessly through the interactive video tool.
Some key features include:
- Users can easily record webcam and screencast video within Canvas
- Users can create and manage a library of videos for use in Canvas (and to share outside of Canvas)
- Instructors can add quiz questions into videos; students respond while watching the video; results go directly into the gradebook
- Instructors can create discussion activities that are based on video (discussion comments are tied to specific points in the video)
- Instructors have access to analytics that display individual usage statistics for each student including the, media viewed, length of view, when viewing was terminated.
- Instructors can access their media using the Canvas Studio course navigation link and have the ability to add Studio media using the rich content editor in Assignments, Discussions, and Pages.
- Videos can be automatically captioned and the captions can be easily edited
- More information on using Canvas Studio in the rich content editor can be found in the Canvas guides.
Getting Started
Canvas Studio allows users to easily record and capture their screen or webcam, creating content for online courses. This guide outlines the steps needed to quickly start recording content and highlights various editing features, including clipping and cutting video content, available in Canvas Studio.
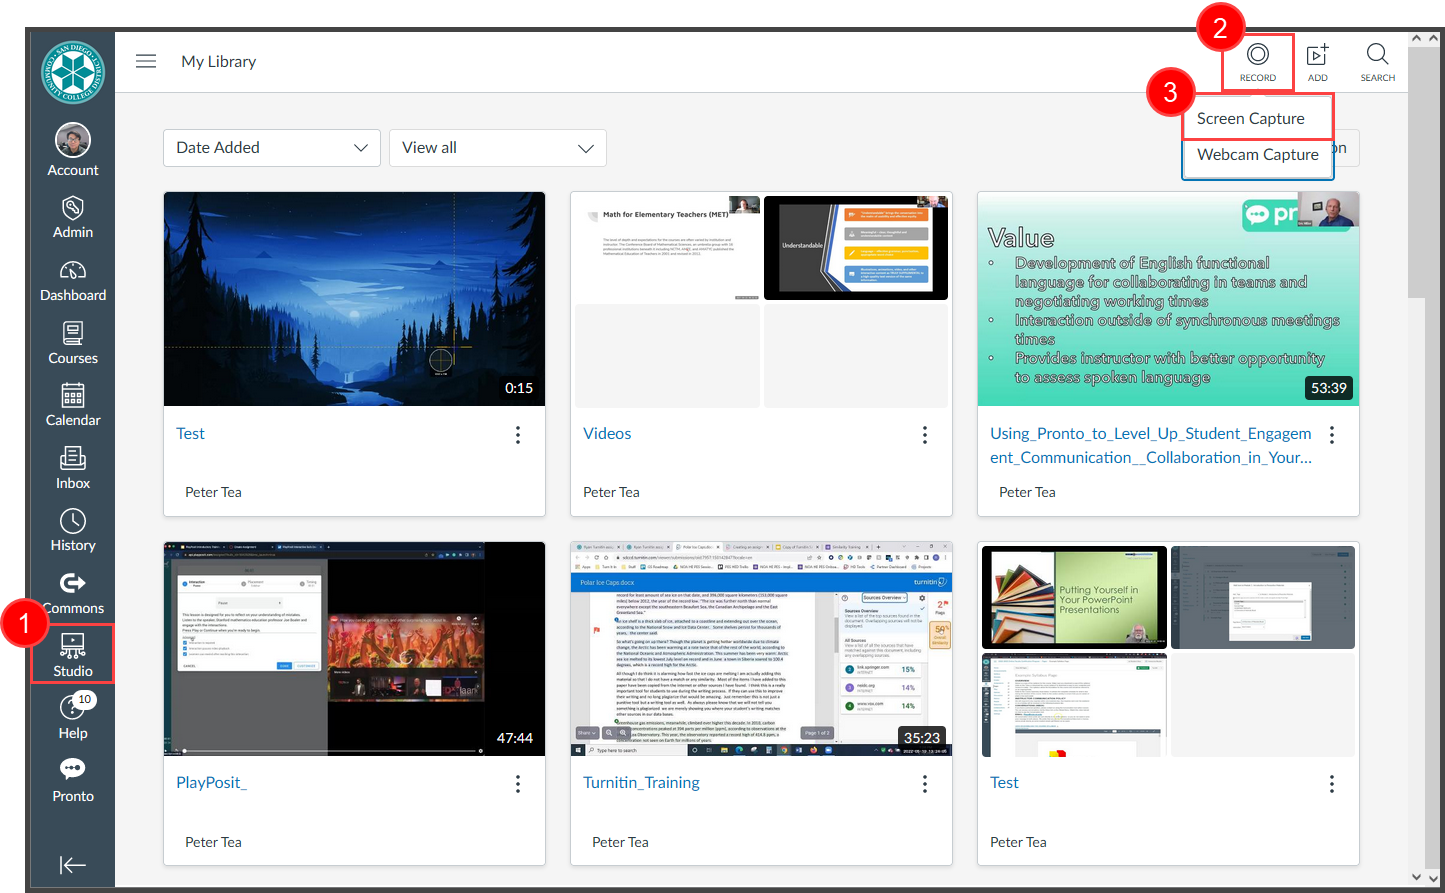
- In order to access Canvas Studio, you can click on the Studio Icon located in the left-hand global navigation menu. You will then be taken to your Canvas Studio Library where you can create or review any content you had created in Canvas Studio.
- To add content to your Canvas Studio Library you have the option to record content directly through Canvas Studio or you can upload content. In this guide we will show you how to record content and you will be clicking on the Record button located on the top right-hand corner of the window.
- A drop-down menu will appear that will give you the options of Screen Capture or Webcam Capture. We'll be clicking on Screen Capture in this example.
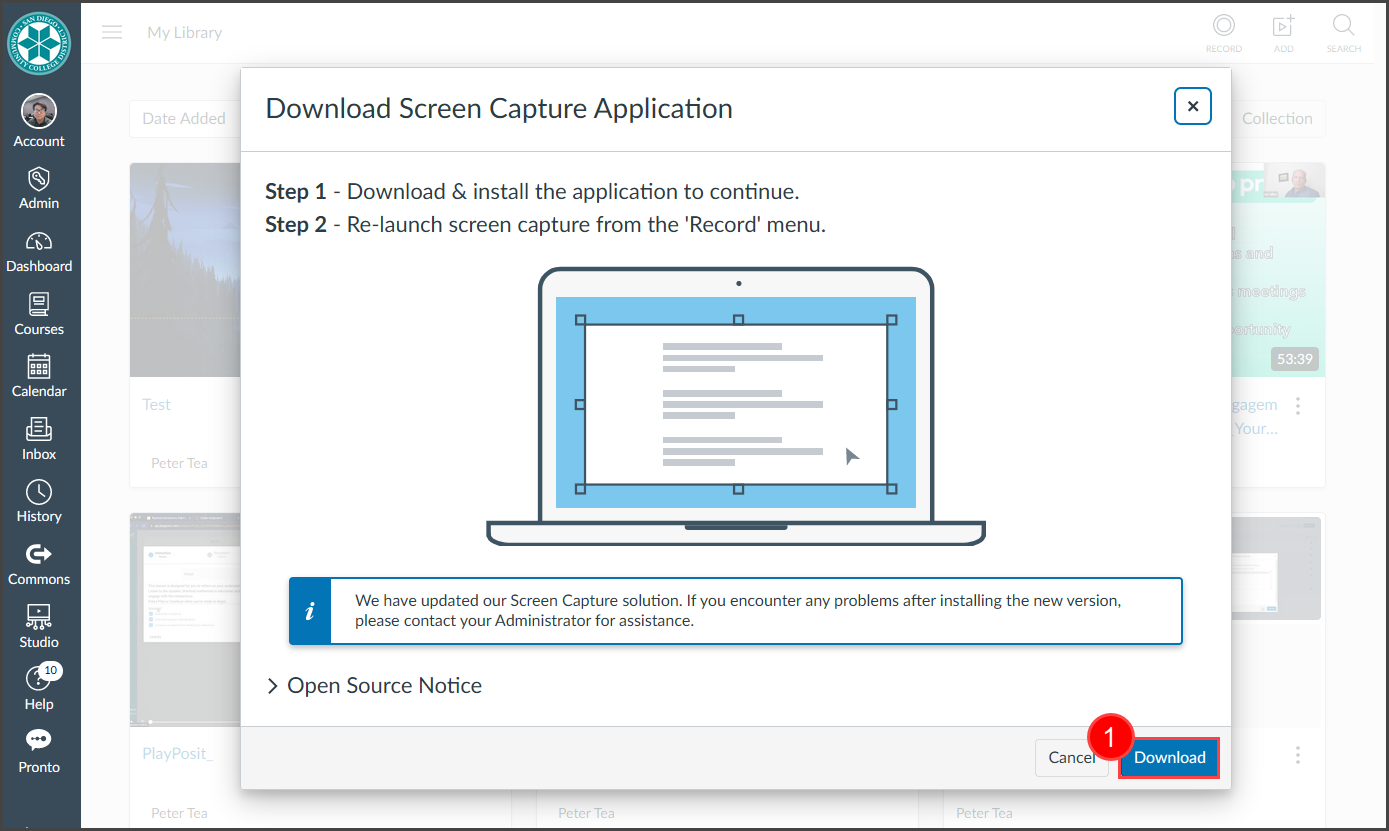
If this is your first time recording content in Canvas Studio, you will receive this notification informing you that you will need to download the screen recorder software onto your device. Click on the Download button and the software will be installed onto your device.
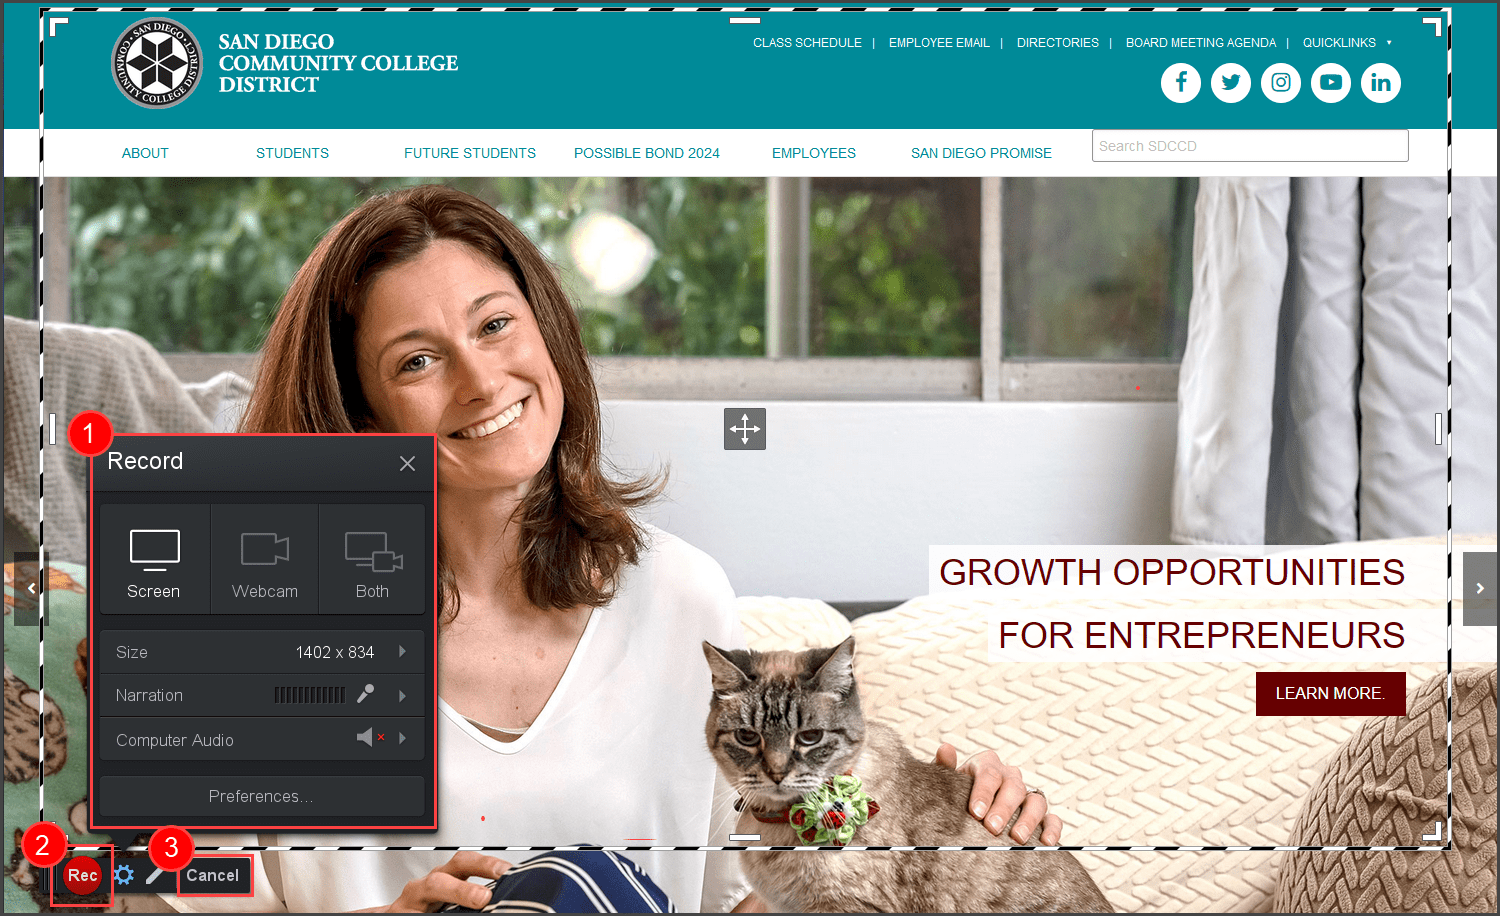
- When the recording tool is launched you will noticed a rectangle with a black and white border appear on your screen. Any content captured in this rectangle will be recorded and you have the option of resizing the rectangle to fit your needs. You also have various options to select if you're recording your screen or adding a webcam, along with other audio settings.
- If you want to start your recording you can click on the red REC button to begin.
- If you wanted to stop the recording process or close the recording software you can click on the Cancel button.
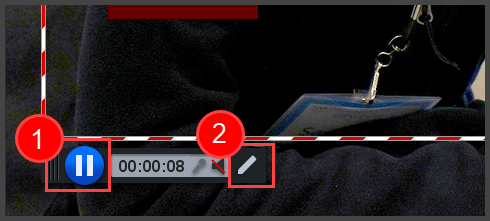
- Once you have started your recording the rectangle will change to a red and white color and a timer will start to indicate that you are currently recording content. Should you want to pause or stop recording you have the option of clicking the blue Pause button.
- You also have annotation tools available by clicking on the Pencil icon.

- After you have paused or stopped your recording you will have the option to continue recording by clicking on the red Rec button. Or you can review your recorded content by clicking on the Play button.
- Should you want to delete your recording you can click on the Trash icon.
- If you are satisifed with your recording you can click on the Done button.
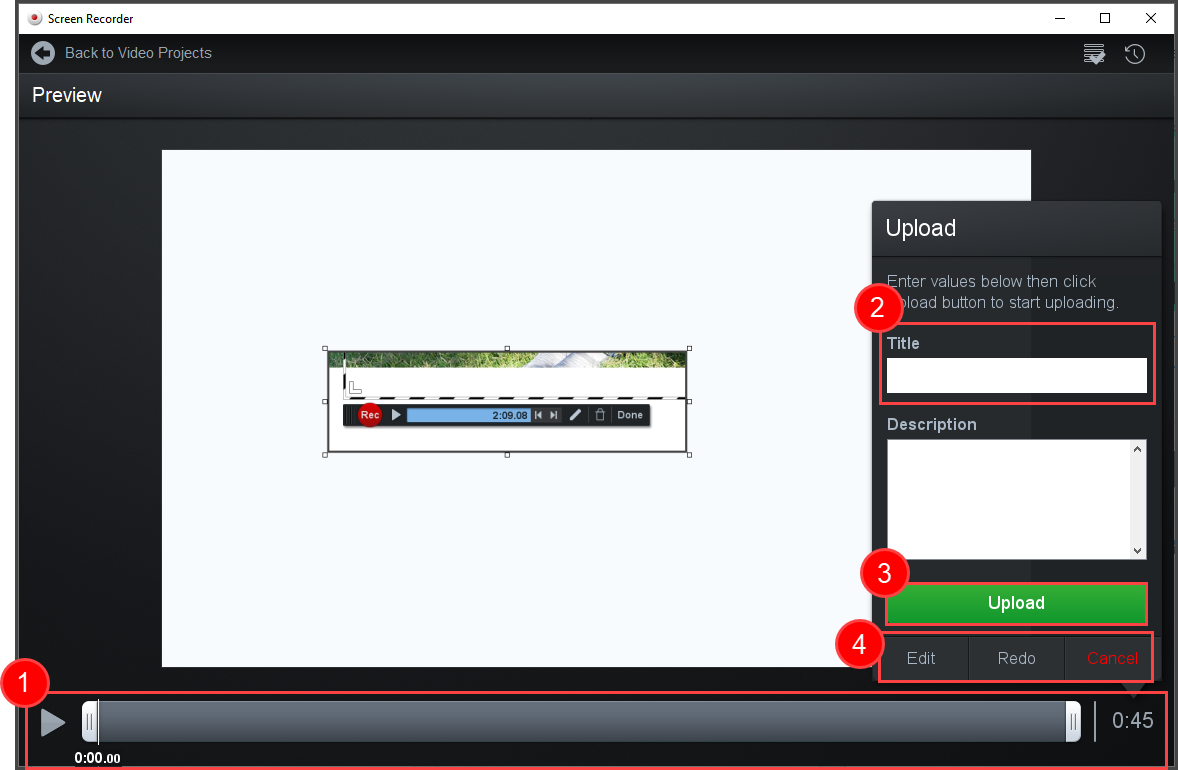
- You will be taken to the Preview screen where you can review your video by clicking on the Play button. You also have the option to trim the beginning or ending of your video by moving the sliders.
- When you are satisfied with your video, you can add a Title.
- You can then begin the upload process by clicking on the Upload button.
- If you wanted to make any edits to the video, redo the recording, or even cancel the recording entirely you can do that here.
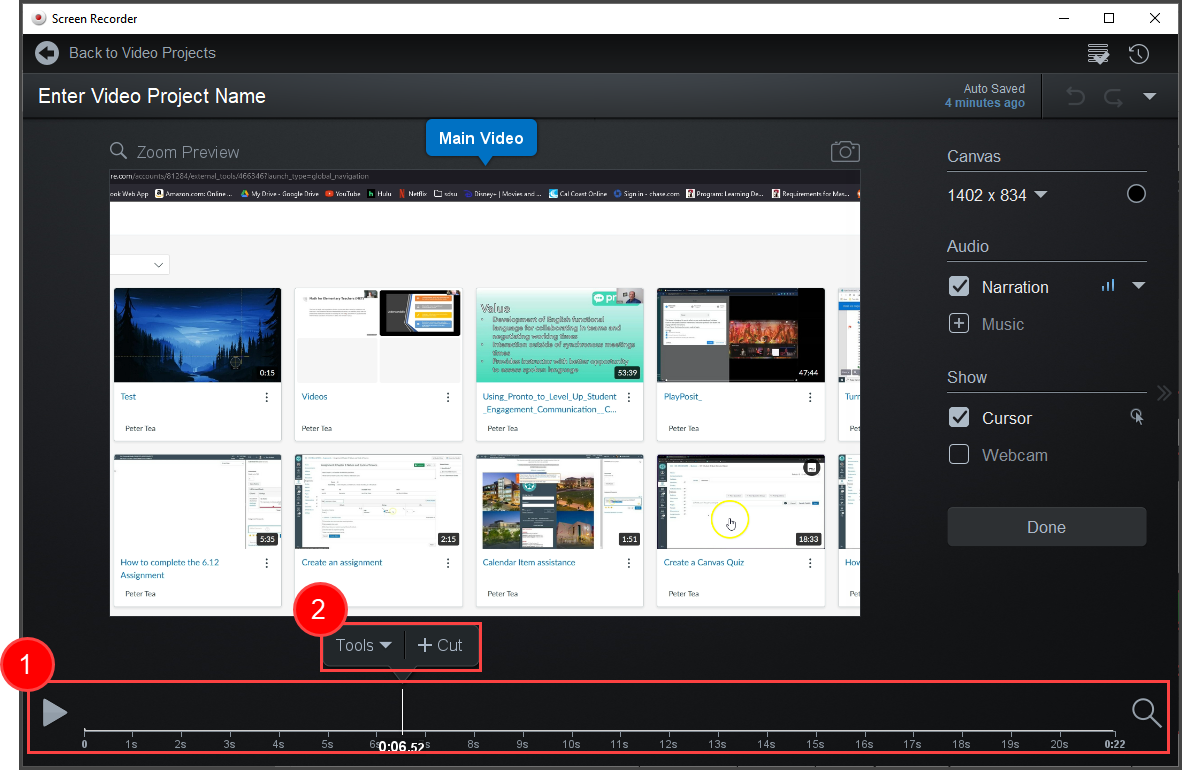
- When you select the Edit option you are taken to the recording software's editing tools. Here you have the option to review your video and use their editing tools.
- When you have located the place in your video that you would like to edit you can select to Cut that portion of the video or you can click on the Tools button to view the various video editing tools available to you.
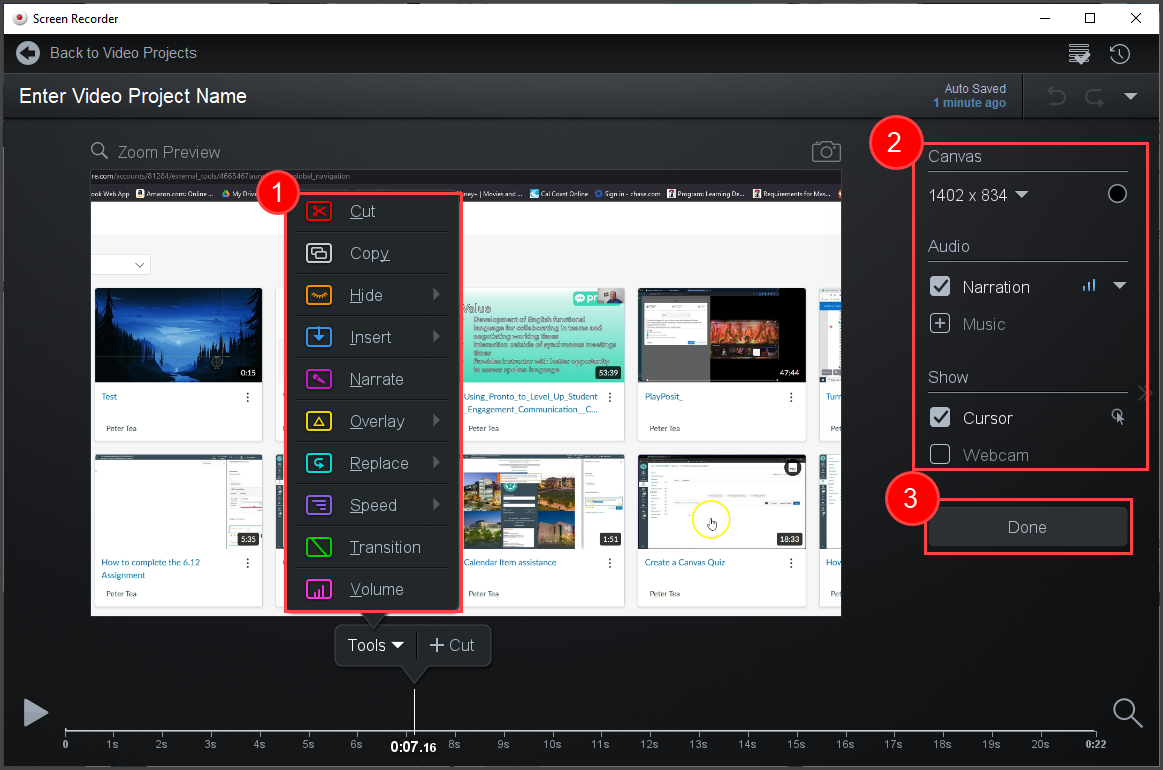
- Here you can see the list of all available editing tools that you can use to revise your video. The tools you have available include:
- Cutting sections out of your video
- Copying and adding select frames or portions of video back into the timeline
- Hiding specific content like a webcam or cursor
- Inserting new recordings, video files, or pauses
- Narrating a specific portion of the video and removing the original audio
- Overlaying images, highlights, arrows, text or even blur portions of your video
- Replacing the video file or freeze frame
- Speeding up or slowing down your video
- Adding transition slides to hide cuts and other edits
- Adjusting the volume of your video
- You also have the option to changet he aspect ratio (size) of your video, any music or narration, and the ability to show your Cursor or webcam (if available).
- Once you are finished editing your video you can select the Done button to return to the Preview Screen.
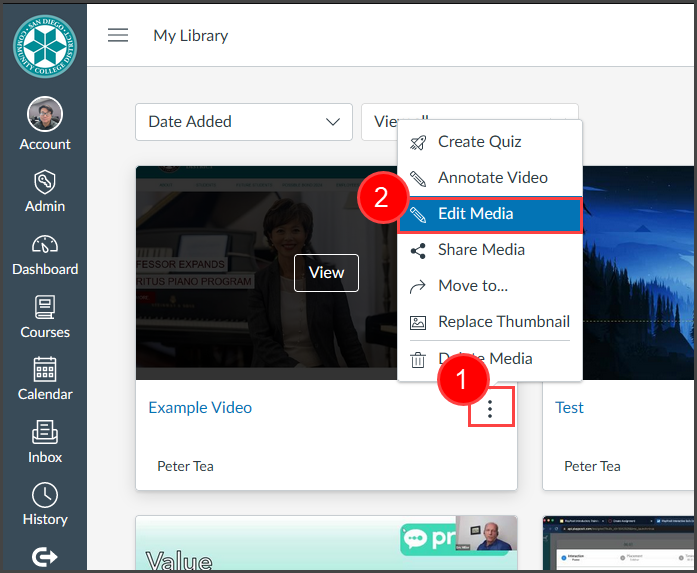
- When you have uploaded your video to Canvas Studio, it will appear on your Canvas Studio Library. To view the various tools and settings available you can click on the three dots located on the right-hand side of the video tile card.
- A new menu will appear and you can select from various tools and settings to enhance your video. If you realized that you needed to make any further edits or revisions to your video you can select the Edit Media button.
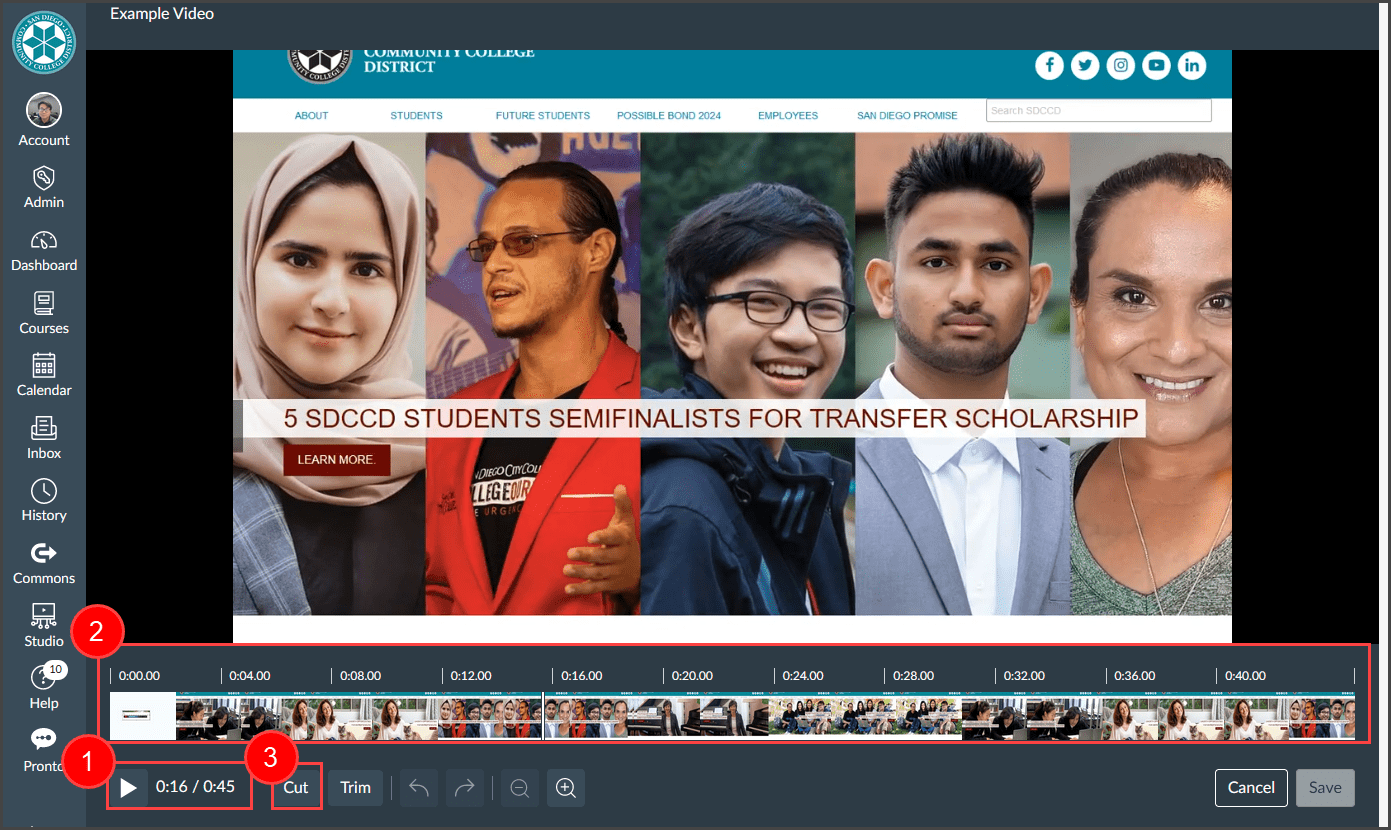
- Canvas Studio also offers editing tools if you need to cut or trim your video. You can review the video and locate the section you wish to edit by selecting the Play button.
- You also have the option of directly locating the section you wish to edit on the timeline.
- When you are ready to edit your video you can select the Cut tool.

- When using the Cutting tool a red highlight will appear over the video timeline that will indicate the section of your video that you will be removing. You have the option to move the highlight or increase or decrease the size of the section you want to cut.
- When you are satisifed with the section of video that you wish to cut. You can click on the Confirm Cut button or Discard if do not want to cut the content.
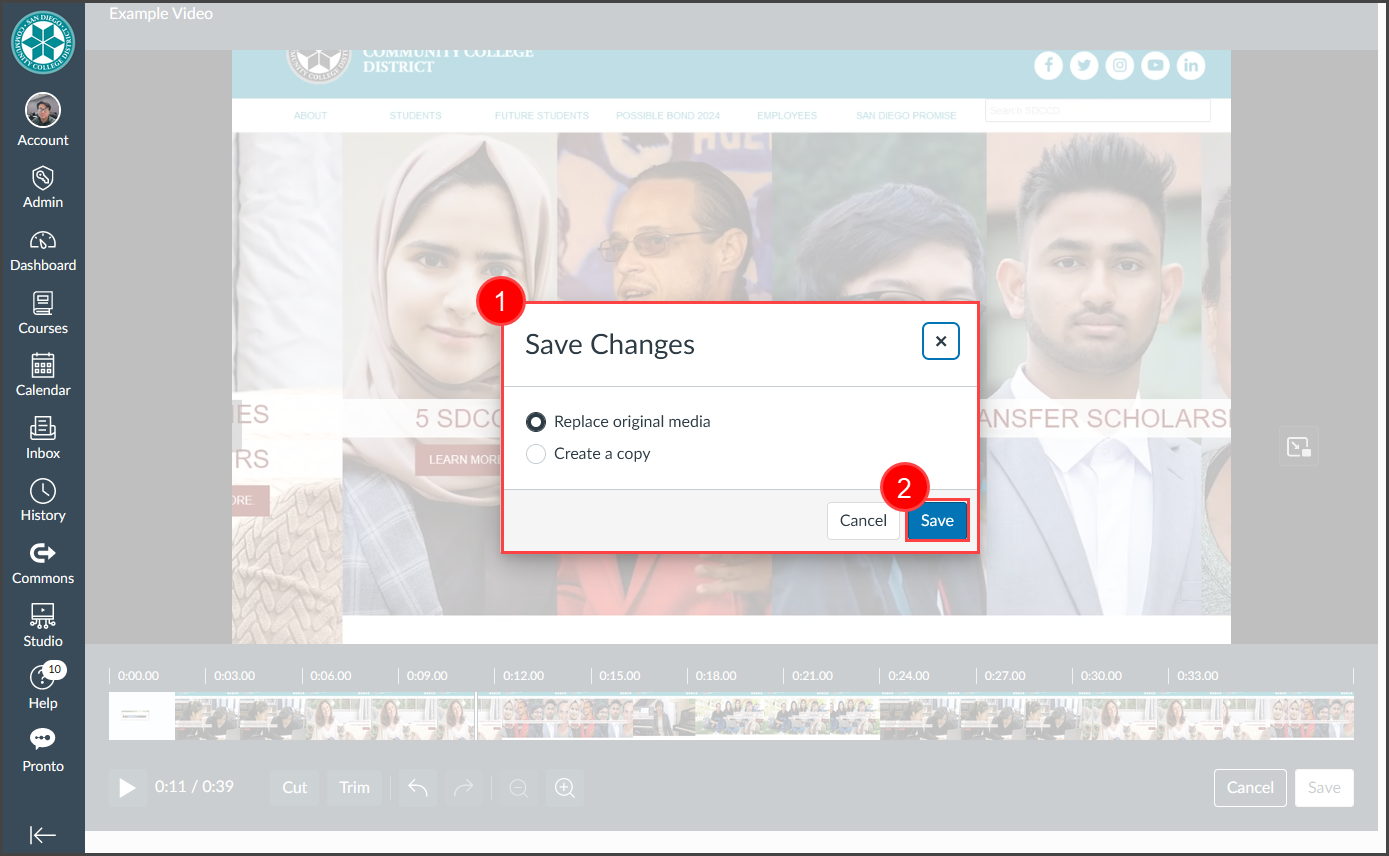
- When you are ready to save your changes, you will be prompted to choose either to replace the original media or you can create a copy just in case you wanted to retain the original video.
- Click on the Save button to upload the edited video to your Canvas Studio Library.
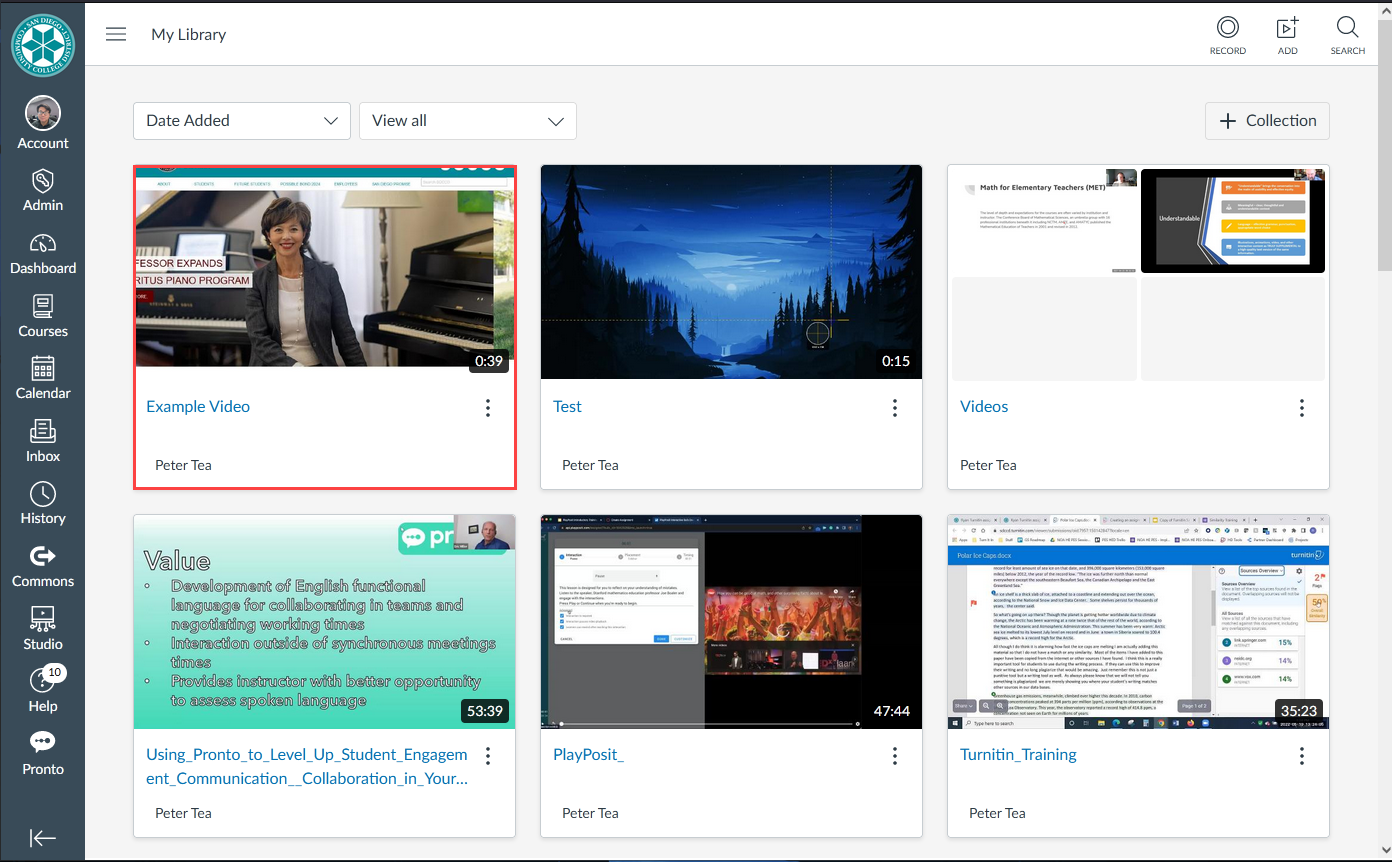
The edited video will process and will be available on your Canvas Studio Library.
Canvas Studio allows instructors to easily incorporate closed captioning to their recorded content to make all recorded content accessible to students, and to satisfy the DE video captioning guidelines. With tools like Canvas Studio's ability to generate closed captions automatically with 85% accuracy will greatly aid in making recorded lectures and other content easier to transcribe and share among your students.
To find out more about the Canvas Studio captioning features, you can visit our Accessibility Center for Video Captioning on our Website.
You can also follow this guide from Canvas: How to use Canvas Studio Captioning Services
More Captioning Support:
YouTube captions do not automatically transfer into Canvas Studio. If you own the YouTube video, you can, however, easily and quickly download your YouTube captions and upload them into Canvas Studio.
Here’s a video showing how to do that: How to add YouTube Captions to Canvas Studio
Things get a little difficult if you need to transfer captions for a YouTube video that you do not own.
It can be done and here’s a video showing one way to do it: How to add captions to a video you do not own, using Canvas Studio
- How do I use Canvas Studio through the Rich Content Editor?
- How do I use Canvas Studio through the Course Navigation Menu as an instructor?
- How do I embed Canvas Studio media in a course?
- How do I view Canvas Studio media in a course?
- How do I record a Canvas Studio video with a webcam in a course?
- How do I record a Canvas Studio screen capture video in a course?
- How do I edit details and tags for Canvas Studio media in a course as an instructor?
- How do I add captions to Canvas Studio media in a course?
- How do I replace a Canvas Studio video thumbnail in a course?
- How do I add comments or replies to Canvas Studio media in a course?
- How do I manage Canvas Studio media comments in a course as an instructor?
- How do I view user insights and analytics for Canvas Studio media in a course as an instructor?
- How do I add a Canvas Studio media assignment in a course as an instructor?
- How do I add Canvas Studio media as an external tool module item as an instructor?
- How do I grade Canvas Studio media submissions in SpeedGrader as an instructor?
- How do I view Canvas Studio media using the Test Student as an instructor?
- How do I use Canvas Studio video quizzing in a course?
- How do I create a Canvas Studio video quiz in a course?
- How do I embed a Canvas Studio video quiz in the Rich Content Editor as an instructor?
- How do I post Canvas Studio video quiz results in the Gradebook?
- How do I view Canvas Studio video quiz results in a course?
If you encounter errors when attempting to record your screen in Canvas Studio.
More guides and videos about Canvas Studio can be located in the SDCCD Video Library.
Try the fixes outlined in this video: How to Troubleshoot Canvas Studio